1. Parameters
This page lists all available Configuration Parameters. If a parameter or section has a tick box on its left side, you can disable it. In such case the functionality gets disabled respectively the default values will be used.
Note
This is an auto-generated page! See the README for details!
1.1 Section TakeImage
1.1.1 Parameter CamAeLevel
Auto-Exposure-Level
range on OV2640 (-2 .. 2)
range on OV3660 and OV5640 (-5 .. 5)
Section: 1.1 TakeImage
Default Value: 0
See here for the ov2640 camera datasheet.
See here for the ov5640 camera datasheet.
Warning
This is an Expert Parameter! Only change it if you understand what it does!
After changing this parameter you need to update your reference image and alignment markers!
Note
The exposure offset for automatic exposure, lower values produce darker image.
Note
This parameter can also be set on the Reference Image configuration page!
1.1.2 Parameter CamAec
Auto-Exposure-Control
- When true, the camera attempts to automatically control the exposure.
- When false, the CamAecValue setting is used instead.
Section: 1.1 TakeImage
Default Value: true
See here for the ov2640 camera datasheet.
See here for the ov5640 camera datasheet.
Warning
This is an Expert Parameter! Only change it if you understand what it does!
After changing this parameter you need to update your reference image and alignment markers!
Note
This parameter can also be set on the Reference Image configuration page!
1.1.3 Parameter CamAec2
Auto-Exposure-Control2
- When true, the sensor’s "night mode" is enabled, extending the range of automatic gain control.
- When false, the sensor’s "night mode" is disabled.
Section: 1.1 TakeImage
Default Value: true
See here for the ov2640 camera datasheet.
See here for the ov5640 camera datasheet.
Warning
This is an Expert Parameter! Only change it if you understand what it does!
After changing this parameter you need to update your reference image and alignment markers!
Note
This may resolve some over-exposure and under-exposure issues.
Note
This parameter can also be set on the Reference Image configuration page!
1.1.4 Parameter CamAecValue
Auto-Exposure-Value
Range (0 .. 1200)
Section: 1.1 TakeImage
Default Value: 160
See here for the ov2640 camera datasheet.
See here for the ov5640 camera datasheet.
Warning
This is an Expert Parameter! Only change it if you understand what it does!
After changing this parameter you need to update your reference image and alignment markers!
Note
Access the exposure value of the camera, higher values produce brighter images.
Note
This parameter can also be set on the Reference Image configuration page!
1.1.5 Parameter CamAgc
Auto-Gain-Control
- When true, the camera attempts to automatically control the sensor gain, up to the value in the CamGainceiling property.
- When false, the CamAgcGain setting is used instead.
Section: 1.1 TakeImage
Default Value: true
See here for the ov2640 camera datasheet.
See here for the ov5640 camera datasheet.
Warning
This is an Expert Parameter! Only change it if you understand what it does!
After changing this parameter you need to update your reference image and alignment markers!
1.1.6 Parameter CamAgcGain
Auto-Gain-Control-Value
Range (0 .. 30)
Section: 1.1 TakeImage
Default Value: 15
See here for the ov2640 camera datasheet.
See here for the ov5640 camera datasheet.
Warning
This is an Expert Parameter! Only change it if you understand what it does!
After changing this parameter you need to update your reference image and alignment markers!
Note
This is used when CamAgc is off.
Note
Access the gain level of the sensor, higher values produce brighter images.
1.1.7 Parameter CamAutoSharpness
Auto-Sharpness
- When true, the camera attempts to automatically adjusts the sharpness.
- When false, the CamSharpness setting is used instead.
Section: 1.1 TakeImage
Default Value: false
See here for the ov2640 camera datasheet.
See here for the ov5640 camera datasheet.
Warning
This is an Expert Parameter! Only change it if you understand what it does!
After changing this parameter you need to update your reference image and alignment markers!
Note
The OV2640 does not officially support auto sharpness, this is an experimental parameter!
Note
This parameter can also be set on the Reference Image configuration page!
1.1.8 Parameter CamAwb
Auto-White-Balance
- When true, the camera attempts to automatically control white balance.
- When false, the CamWbMode setting is used instead.
Section: 1.1 TakeImage
Default Value: true
See here for the ov2640 camera datasheet.
See here for the ov5640 camera datasheet.
Warning
This is an Expert Parameter! Only change it if you understand what it does!
After changing this parameter you need to update your reference image and alignment markers!
1.1.9 Parameter CamAwbGain
Auto-White-Balance-Gain
- Enable/Disable CamAwbGain control.
Section: 1.1 TakeImage
Default Value: true
See here for the ov2640 camera datasheet.
See here for the ov5640 camera datasheet.
Warning
This is an Expert Parameter! Only change it if you understand what it does!
After changing this parameter you need to update your reference image and alignment markers!
1.1.10 Parameter CamBpc
Black-Pixel-Correction
- Enable/Disable black point compensation, this can make black parts of the image darker.
Section: 1.1 TakeImage
Default Value: true
See here for the ov2640 camera datasheet.
See here for the ov5640 camera datasheet.
Warning
This is an Expert Parameter! Only change it if you understand what it does!
After changing this parameter you need to update your reference image and alignment markers!
1.1.11 Parameter CamBrightness
Image-Brightness
Range (-2 .. 2)
Section: 1.1 TakeImage
Default Value: 0
See here for the ov2640 camera datasheet.
See here for the ov5640 camera datasheet.
Warning
After changing this parameter you need to update your reference image and alignment markers!
Note
This parameter can also be set on the Reference Image configuration page!
1.1.12 Parameter CamColorbar
Colorbar
currently not implemented.
Section: 1.1 TakeImage
Default Value: false
See here for the ov2640 camera datasheet.
See here for the ov5640 camera datasheet.
Warning
This is an Expert Parameter! Only change it if you understand what it does!
1.1.13 Parameter CamContrast
Image-Contrast
Range (-2 .. 2)
Section: 1.1 TakeImage
Default Value: 0
See here for the ov2640 camera datasheet.
See here for the ov5640 camera datasheet.
Warning
After changing this parameter you need to update your reference image and alignment markers!
Note
This parameter can also be set on the Reference Image configuration page!
1.1.14 Parameter CamDcw
Image-Downsize
- When CamDcw is on, the image that you receive will be the size that you requested (VGA, QQVGA, etc).
- When CamDcw is off, the image that you receive will be one of UXGA, SVGA, or CIF.
Section: 1.1 TakeImage
Default Value: true
See here for the ov2640 camera datasheet.
See here for the ov5640 camera datasheet.
Warning
This is an Expert Parameter! Only change it if you understand what it does!
After changing this parameter you need to update your reference image and alignment markers!
If CamZoom is used, this must be activated.
Note
If CamDcw is off, and you pick a different image size, this implicitly turns CamDcw back on again.
1.1.15 Parameter CamDenoise
Image-Denoise
- Denoise Image, is only supported by OV3660 and OV5640
range on OV3660 and OV5640 (0 .. 8)
Section: 1.1 TakeImage
Default Value: 0
See here for the ov2640 camera datasheet.
See here for the ov5640 camera datasheet.
Warning
This is an Expert Parameter! Only change it if you understand what it does!
1.1.16 Parameter CamGainceiling
Gain-Ceiling
Available options:
x2x4x8x16x32x64x128
Default Value for ov2640: x4
Default Value for ov5640: x8
See here for the ov2640 camera datasheet.
See here for the ov5640 camera datasheet.
Warning
This is an Expert Parameter! Only change it if you understand what it does!
After changing this parameter you need to update your reference image and alignment markers!
Note
A higher gain means that the sensor has a greater response to light, but also makes sensor noise more visible.
This is used when CamAgc is on.
Note
The Gain is an analog multiplier applied to the raw sensor data.
The Ceiling is the maximum gain value that the sensor will use.
1.1.17 Parameter CamHmirror
Mirror-Image
- When true, the camera image is mirrored left-to-right.
Section: 1.1 TakeImage
Default Value: false
See here for the ov2640 camera datasheet.
See here for the ov5640 camera datasheet.
Warning
After changing this parameter you need to update your reference image and alignment markers!
Note
This parameter can also be set on the Reference Image configuration page!
1.1.18 Parameter CamLenc
Lens-Correction
- Enable/Disable lens correction.
Section: 1.1 TakeImage
Default Value: true
See here for the ov2640 camera datasheet.
See here for the ov5640 camera datasheet.
Warning
This is an Expert Parameter! Only change it if you understand what it does!
After changing this parameter you need to update your reference image and alignment markers!
Note
This can help compensate for light fall-off at the edge of the sensor area.
1.1.19 Parameter CamQuality
Image-Quality
Range (8 .. 63)
Section: 1.1 TakeImage
Default Value: 10
See here for the ov2640 camera datasheet.
See here for the ov5640 camera datasheet.
Warning
This is an Expert Parameter! Only change it if you understand what it does!
After changing this parameter you need to update your reference image and alignment markers!
Value below 10 could result in system instabilities!
Note
Quality index for pictures: 8 (highest quality) ... 63 (lowest quality)
This is similar to the quality setting when exporting a jpeg image from photo editing software.
1.1.20 Parameter CamRawGma
Raw-Gamma
- Enable/Disable raw gamma mode.
Section: 1.1 TakeImage
Default Value: true
See here for the ov2640 camera datasheet.
See here for the ov5640 camera datasheet.
Warning
This is an Expert Parameter! Only change it if you understand what it does!
After changing this parameter you need to update your reference image and alignment markers!
Note
The main purpose of the Gamma (GMA) function is to compensate for the non-linear characteristics of the sensor. GMA converts the pixel values according to the Gamma curve to compensate the sensor output under different light strengths. The non-linear gamma curve is approximately constructed with different linear functions. Raw gamma compensates the image in the RAW domain.
1.1.21 Parameter CamSaturation
Image-Saturation
Range (-2 .. 2)
Section: 1.1 TakeImage
Default Value: 0
See here for the ov2640 camera datasheet.
See here for the ov5640 camera datasheet.
Warning
After changing this parameter you need to update your reference image and alignment markers!
Note
Positive values increase saturation (more vibrant colors), negative values lower it (more muted colors).
Note
This parameter can also be set on the Reference Image configuration page!
1.1.22 Parameter CamSharpness
Image-Sharpness
Range (-2 .. 2)
Section: 1.1 TakeImage
Default Value: 0
See here for the ov2640 camera datasheet.
See here for the ov5640 camera datasheet.
Warning
This is an Expert Parameter! Only change it if you understand what it does!
After changing this parameter you need to update your reference image and alignment markers!
Note
The OV2640 does not officially support sharpness, this is an experimental parameter!
Note
Positive values increase sharpness (more defined edges), negative values lower it (softer edges).
This is used when CamAutoSharpness is off.
Note
This parameter can also be set on the Reference Image configuration page!
1.1.23 Parameter CamSpecialEffect
Image-Special-Effect
Available options:
no_effectnegativegrayscaleredgreenblueretro
Section: 1.1 TakeImage
Default Value: no_effect
See here for the ov2640 camera datasheet.
See here for the ov5640 camera datasheet.
Warning
This is an Expert Parameter! Only change it if you understand what it does!
After changing this parameter you need to update your reference image and alignment markers!
Note
This parameter can also be set on the Reference Image configuration page!
1.1.24 Parameter CamVflip
Flip-Image
- When true, the camera image is flipped top-to-bottom.
Section: 1.1 TakeImage
Default Value: false
See here for the ov2640 camera datasheet.
See here for the ov5640 camera datasheet.
Warning
After changing this parameter you need to update your reference image and alignment markers!
Note
On some OV5640 Cameras, the image becomes reddish when Vflip is used in conjunction with the zoom function!
Note
This parameter can also be set on the Reference Image configuration page!
1.1.25 Parameter CamWbMode
White-Balance-Mode
Available options:
autosunnycloudyofficehome
Section: 1.1 TakeImage
Default Value: auto
See here for the ov2640 camera datasheet.
See here for the ov5640 camera datasheet.
Warning
After changing this parameter you need to update your reference image and alignment markers!
Note
This is used when CamAwb is off.
Note
This parameter can also be set on the Reference Image configuration page!
1.1.26 Parameter CamWpc
White-Pixel-Correction
- Enable/Disable white point compensation, his can make white parts of the image whiter.
Section: 1.1 TakeImage
Default Value: true
See here for the ov2640 camera datasheet.
See here for the ov5640 camera datasheet.
Warning
After changing this parameter you need to update your reference image and alignment markers!
Note
This parameter can also be set on the Reference Image configuration page!
1.1.27 Parameter CamZoom
Digital-Zoom
- Enable/Disable digital zoom.
Section: 1.1 TakeImage
Default Value: false
See here for the ov2640 camera datasheet.
See here for the ov5640 camera datasheet.
Warning
This is an Expert Parameter! Only change it if you understand what it does!
After changing this parameter you need to update your reference image and alignment markers!
Note
It is always zoomed into the center of the image, if CamZoomOffsetX and CamZoomOffsetY are zero.
Note
This parameter can also be set on the Reference Image configuration page!
1.1.28 Parameter CamZoomOffsetX
Digital-Zoom-OffsetX
range on OV2640 (-480 .. 480)
range on OV3660 (-704 .. 704)
range on OV5640 (-960 .. 960)
Section: 1.1 TakeImage
Default Value: 0
See here for the ov2640 camera datasheet.
See here for the ov5640 camera datasheet.
Warning
This is an Expert Parameter! Only change it if you understand what it does!
After changing this parameter you need to update your reference image and alignment markers!
Note
X displacement of the image from the center.
Positive values shift the image to the right, negative values to the left.
The maximum possible offset depends on the value of the CamZoomSize.
Note
This parameter can also be set on the Reference Image configuration page!
1.1.29 Parameter CamZoomOffsetY
Digital-Zoom-OffsetY
range on OV2640 (-360 .. 360)
range on OV3660 (-528 .. 528)
range on OV5640 (-720 .. 720)
Section: 1.1 TakeImage
Default Value: 0
See here for the ov2640 camera datasheet.
See here for the ov5640 camera datasheet.
Warning
This is an Expert Parameter! Only change it if you understand what it does!
After changing this parameter you need to update your reference image and alignment markers!
Note
Y displacement of the image from the center.
Positive values move the image up, negative values move the image down.
The maximum possible offset depends on the value of the CamZoomSize.
Note
This parameter can also be set on the Reference Image configuration page!
1.1.30 Parameter CamZoomSize
Digital-Zoom-Size
range on OV2640 (0 .. 29)
range on OV3660 (0 .. 43)
range on OV5640 (0 .. 59)
Section: 1.1 TakeImage
Default Value: 0
See here for the ov2640 camera datasheet.
See here for the ov5640 camera datasheet.
Warning
This is an Expert Parameter! Only change it if you understand what it does!
After changing this parameter you need to update your reference image and alignment markers!
Note
Zoom factor/level of the digital zoom, the larger the value, the more it zooms in.
Note
This parameter can also be set on the Reference Image configuration page!
1.1.31 Parameter Demo
Enable to use demo images instead of the real camera images.
Make sure to have a /demo folder on your SD-Card and make sure it contains the expected files!
Check here for details.
Section: 1.1 TakeImage
Default Value: false
Warning
This is an Expert Parameter! Only change it if you understand what it does!
1.1.32 Parameter LEDIntensity
Set the Flash LED Intensity: (0 .. 100)
Section: 1.1 TakeImage
Default Value: 50
Note
After changing this parameter you need to update your reference image and alignment markers!
Note
This parameter can also be set on the Reference Image configuration page!
1.1.33 Parameter RawImagesLocation
Location on the SD-Card to store the raw images.
Section: 1.1 TakeImage
Default Value: /log/source
Warning
A SD-Card has limited write cycles. Since the device does not do Wear Leveling, this can wear out your SD-Card!
1.1.34 Parameter RawImagesRetention
Number of days to keep the raw images (0 = forever)
Unit: Days
Section: 1.1 TakeImage
Default Value: 15
1.1.35 Parameter WaitBeforeTakingPicture
Waiting time between switching the flash light (onboard LED) on and taking the picture.
Unit: seconds
Section: 1.1 TakeImage
Default Value: 5
Warning
This is an Expert Parameter! Only change it if you understand what it does!
1.2 Section Alignment
1.2.1 Parameter AlignmentAlgo
Section: 1.2 Alignment
Default Value: Default
Warning
This is an Expert Parameter! Only change it if you understand what it does!
Algorithm used for the alignment step.
Available options:
Default: Use only red color channelHighAccuracy: Use all 3 color channels (3x slower)Fast: First time useHighAccuracy, then only check if the image is shiftedOff: Disable alignment algorithm
1.2.2 Parameter InitialRotate
Section: 1.2 Alignment
Default Value: 0
Unit: Degrees
Note
This parameter can also be set on the Reference Image configuration page!
Note
After changing this parameter you need to update your reference image and alignment markers!
Initial rotation of image before alignment in degree (-360 .. +360)
1.2.3 Parameter SearchFieldX
Section: 1.2 Alignment
Default Value: 20
Unit: Pixels
Warning
This is an Expert Parameter! Only change it if you understand what it does!
X-size (width) in which the reference is searched.
Note
Since the alignment is one of the steps using a lot of computation time, the search field should be as small as possible. The calculation time goes quadratic with the search field size.
1.2.4 Parameter SearchFieldY
Section: 1.2 Alignment
Default Value: 20
Unit: Pixels
Warning
This is an Expert Parameter! Only change it if you understand what it does!
Y-size (height) in which the reference is searched.
Note
Since the alignment is one of the steps using a lot of computation time, the search field should be as small as possible. The calculation time goes quadratic with the search field size.
1.3 Section Digits
1.3.1 Parameter CNNGoodThreshold
Section: 1.3 Digits
Default Value: 0.5
Warning
This is an Expert Parameter! Only change it if you understand what it does!
Threshold above which the classification should be to accept the value (only meaningful for digits).
Warning
This is only supported for the dig-class100 models!
1.3.2 Parameter Model
Section: 1.3 Digits
Default Value: /config/dig-cont_*.tflite (See /config/config.ini)
Path to CNN model file for image recognition. See here for details.
1.3.3 Parameter ROIImagesLocation
Section: 1.3 Digits
Default Value: /log/digit
Location to store separated digit images on the SD-Card.
Warning
A SD-Card has limited write cycles. Since the device does not do Wear Leveling, this can wear out your SD-Card!
1.3.4 Parameter ROIImagesRetention
Section: 1.3 Digits
Default Value: 3
Unit: Days
Days to keep the separated digit images (0 = forever).
1.4 Section Analog
1.4.1 Parameter CNNGoodThreshold
Section: 1.4 Analog
Default Value: 0.5
Warning
This is an Expert Parameter! Only change it if you understand what it does!
Threshold above which the classification should be to accept the value (only meaningful for digits).
Warning
This is only supported for the ana-class100 models!
1.4.2 Parameter ExtendedResolution
Warning
This parameter is unused!
Use NUMBER.ExtendedResolution instead!
1.4.3 Parameter Model
Section: 1.4 Analog
Default Value: /config/ana-cont_*.tflite (See /config/config.ini)
Path to CNN model file for image recognition. See here for details.
1.4.4 Parameter ROIImagesLocation
Section: 1.4 Analog
Default Value: /log/analog
Location to store separated analog images on the SD-Card.
Warning
A SD-Card has limited write cycles. Since the device does not do Wear Leveling, this can wear out your SD-Card!
1.4.5 Parameter ROIImagesRetention
Section: 1.4 Analog
Default Value: 3
Unit: Days
Days to keep the separated analog images (0 = forever).
1.5 Section PostProcessing
1.5.1 Parameter AllowNegativeRates
Warning
This parameter is unused!
Use NUMBER.AllowNegativeRates instead!
1.5.2 Parameter ErrorMessage
Section: 1.5 PostProcessing
Default Value: true
Warning
This is an Expert Parameter! Only change it if you understand what it does!
Do not show error message in return value. In an error case, the last valid number will be used for the various transmission protocols (MQTT, InfluxDB, REST, ...).
1.5.3 Parameter AllowNegativeRates
Section: 1.5 PostProcessing
Default Value: false
Allow a meter to count backwards (decreasing values).
Note
This is unusual (it means there is a negative rate) and not wanted in most cases!
Note
If you edit the config file manually, you must prefix this parameter with <NUMBER> followed by a dot (eg. main.AllowNegativeRates). The reason is that this parameter is specific for each <NUMBER> (<NUMBER> is the name of the number sequence defined in the ROI's).
1.5.4 Parameter AnalogToDigitTransitionStart
Section: 1.5 PostProcessing
Default Value: 9.2
This can be used if you have wrong values, but the recognition of the individual ROIs are correct. Look for the start of changing of the first digit and note the analog pointer value behind. Set it here. Only used on combination of digits and analog pointers. See here for details.
Range: 6.0 .. 9.9.
Note
If you edit the config file manually, you must prefix this parameter with <NUMBER> followed by a dot (eg. main.AnalogToDigitTransitionStart). The reason is that this parameter is specific for each <NUMBER> (<NUMBER> is the name of the number sequence defined in the ROI's).
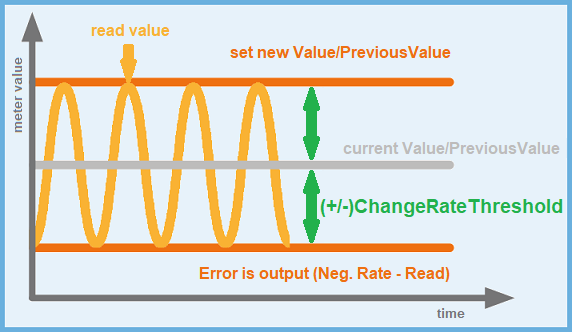
1.5.5 Parameter ChangeRateThreshold
Section: 1.5 PostProcessing
Default Value: 2
Range: 0 .. 9.
Threshold parameter for change rate detection.
This parameter is intended to compensate for small reading fluctuations that occur when the meter does not change its value for a long time (e.g. at night) or slightly turns backwards. This can eg. happen on watermeters.
It is only applied to the last digit of the read value (See example below). If the read value is within PreValue +/- Threshold, no further calculation is carried out and the Value/Prevalue remains at the old value.
Note
If you edit the config file manually, you must prefix this parameter with <NUMBER> followed by a dot (eg. main.ChangeRateThreshold). The reason is that this parameter is specific for each <NUMBER> (<NUMBER> is the name of the number sequence defined in the ROI's).
1.5.5.1 Example
- Smallest ROI provides value for
0.000'x(Eg. a water meter with 4 pointers behind the decimal point) - ChangeRateThreshold = 2
1.5.5.1.0.1 With ExtendedResolution disabled
PreValue: 123.456'7 -> Threshold = +/-0.000'2.
All changes between 123.456'5 and 123.456'9 get ignored
1.5.5.1.0.2 With ExtendedResolution enabled
PreValue: 123.456'78 -> Threshold = +/-0.000'02.
All changes between 123.456'76 and 123.456'80 get ignored.
1.5.6 Parameter CheckDigitIncreaseConsistency
Section: 1.5 PostProcessing
Default Value: false
Warning
This is an Expert Parameter! Only change it if you understand what it does!
An additional consistency check. It especially improves the zero crossing check between digits.
Note
If you edit the config file manually, you must prefix this parameter with <NUMBER> followed by a dot (eg. main.CheckDigitIncreaseConsistency). The reason is that this parameter is specific for each <NUMBER> (<NUMBER> is the name of the number sequence defined in the ROI's).
1.5.7 Parameter DecimalShift
Section: 1.5 PostProcessing
Default Value: 0
Shift the decimal separator (positiv or negativ).
Eg. to move from m³ to liter (1 m³ equals 1000 liters), you need to set it to +3.
Note
If you edit the config file manually, you must prefix this parameter with <NUMBER> followed by a dot (eg. main.DecimalShift). The reason is that this parameter is specific for each <NUMBER> (<NUMBER> is the name of the number sequence defined in the ROI's).
1.5.8 Parameter ExtendedResolution
Section: 1.5 PostProcessing
Default Value: false
Use the decimal place of the last analog counter for increased accuracy.
Note
This parameter is only supported on the *-class* and *-const models! See Choosing-the-Model for details.
Note
If you edit the config file manually, you must prefix this parameter with <NUMBER> followed by a dot (eg. main.ExtendedResolution). The reason is that this parameter is specific for each <NUMBER> (<NUMBER> is the name of the number sequence defined in the ROI's).
1.5.9 Parameter IgnoreLeadingNaN
Section: 1.5 PostProcessing
Default Value: true
Leading N's will be deleted before further processing.
This is only relevant for models which use N!
See here for details.
Note
If you edit the config file manually, you must prefix this parameter with <NUMBER> followed by a dot (eg. main.IgnoreLeadingNaN). The reason is that this parameter is specific for each <NUMBER> (<NUMBER> is the name of the number sequence defined in the ROI's).
1.5.10 Parameter MaxRateType
Section: 1.5 PostProcessing
Default Value: AbsoluteChange
Defines if the Change Rate is calculated as the difference between the last two readings (AbsoluteChange = difference) or
as the difference normalized to the interval (RateChange = difference per minute).
Note
If you edit the config file manually, you must prefix this parameter with <NUMBER> followed by a dot (eg. main.MaxRateType). The reason is that this parameter is specific for each <NUMBER> (<NUMBER> is the name of the number sequence defined in the ROI's).
1.5.11 Parameter MaxRateValue
Section: 1.5 PostProcessing
Default Value: 0,05
Maximum allowed change between two readings, if exceeded the last reading will be rejected. Depending on the settings of <NUMBER>.MaxRateType the MaxRateValue is either treated as the difference between the two measurements (AbsoluteChange = difference) not taking the set time interval into account or as the difference normalized to the interval (RateChange = difference per minute).
If negative rate is disallowed and no maximum rate value is set, one false high reading will lead to a period of missing measurements until the measurement reaches the previous false high reading. E.g. if the counter is at 600,00 and it's read incorrectly as610,00, all measurements will be skipped until the counter reaches 610,00. Setting the MaxRateValue to 0,05 leads to a rejection of all readings with a difference > 0,05, in this case 610,00. The rejection also applies to correct readings with a difference > 0,05!
Note
If you edit the config file manually, you must prefix this parameter with <NUMBER> followed by a dot (eg. main.MaxRateValue). The reason is that this parameter is specific for each <NUMBER> (<NUMBER> is the name of the number sequence defined in the ROI's).
1.5.12 Parameter PreValueAgeStartup
Section: 1.5 PostProcessing
Default Value: 720
Warning
This is an Expert Parameter! Only change it if you understand what it does!
Time in minutes, how long a previous read value is valid after reboot.
1.5.13 Parameter PreValueUse
Section: 1.5 PostProcessing
Default Value: true
Use the previous value (value from previous round) for consistency checks. This also works through a reboot of the device!
1.6 Section MQTT
1.6.1 Parameter CACert
Section: 1.6 MQTT
Default Value: ""
Example: /config/certs/RootCA.crt.
Warning
This is an Expert Parameter! Only change it if you understand what it does!
Path to the CA certificate file.
This is part of the configuration to enable TLS 1.2 for MQTT.
The CA Certificate is used by the client to validate the broker is who it claims to be. It allows the client to authenticate the server, which is the first part of the MTLS handshake.
Usually there is a common RootCA certificate for the MQTT broker. More information is available here.
For more information on how to create your own certificate, see: mosquitto.org or emqx.com.
Note
This also means that you might have to change the protocol and port in uri to mqtts://example.com:8883!
Only Certificates up to 4096 Bit are supported!
1.6.2 Parameter ClientCert
Section: 1.6 MQTT
Default Value: ""
Example: /config/certs/client.crt.
Warning
This is an Expert Parameter! Only change it if you understand what it does!
Path to the Client Certificate file.
This is part of the configuration to enable TLS 1.2 for MQTT.
The Client Certificate is used by the client to prove its identity to the server, in conjunction with the Client Key. It is the second part of the MTLS handshake.
Usually there is a one pair of Client Certificate/Key for each client that connects to the MQTT broker. More information is available here.
For more information on how to create your own certificate, see: mosquitto.org or emqx.com.
Note
If set, ClientKey must be set too.
This also means that you might have to change the protocol and port in uri to mqtts://example.com:8883!
1.6.3 Parameter ClientID
Section: 1.6 MQTT
Default Value: watermeter
Client ID used to connect to the MQTT broker.
If disabled, the hostname will be used.
1.6.4 Parameter ClientKey
Section: 1.6 MQTT
Default Value: ""
Example: /config/certs/client.key.
Warning
This is an Expert Parameter! Only change it if you understand what it does!
Path to the Client Key file.
This is part of the configuration to enable TLS 1.2 for MQTT.
The Client Key is used by the client to prove its identity to the server, in conjunction with the Client Certificate. It is the second part of the MTLS handshake.
Usually there is a one pair of Client Certificate/Key for each client that connects to the MQTT broker
For more information on how to create your own certificate, see: mosquitto.org or emqx.com.
Note
If set, ClientCert must be set too.
This also means that you might have to change the protocol and port in uri to mqtts://example.com:8883!
1.6.5 Parameter DomoticzTopicIn
Section: 1.6 MQTT
Default Value: domoticz/in
Domoticz "in" topic as configured on the "MQTT Client Gateway" setup page on the Domoticz system. Used to publish counter/s value/s.
Parameter <NUMBER>.DomoticzIDX is required (see below).
1.6.6 Parameter HomeassistantDiscovery
Section: 1.6 MQTT
Default Value: true
Enable or disable the Homeassistant Discovery. See here for details about the discovery.
1.6.7 Parameter MainTopic
Section: 1.6 MQTT
Default Value: watermeter
MQTT main topic, under which the counters are published.
The single value will be published with the following key: MAINTOPIC/NUMBER/RESULT_TOPIC
With:
NUMBER: The name of the value (a meter might have more than one value). The names get defined in the analog and digit ROI configuration (defaults tomain).RESULT_TOPIC: Automatically filled with the right name, eg.value,rate,timestamp,error, ....
The general connection status can be found in MAINTOPIC/CONNECTION.
See MQTT Result Topics for a full list of topics.
Note
The main topic is allowed to contain / which can be used to split it into multiple levels, eg. /basement/meters/watermeter/1/ if you have multiple water meters in your basement.
The nodeId for the Home Assistant MQTT Service Discovery must follow the schema <discovery_prefix>/<component>/[<node_id>/]<object_id>/config. The node_id is not configurable but derived from the MainTopic by stripping any but the last topic level. A MainTopic with the value home/basement/watermeter is transformed into the node_id watermeter, resulting in the discovery topic homeassistant/sensor/watermeter/value/config for the current value.
1.6.8 Parameter MeterType
Section: 1.6 MQTT
Default Value: other
Select the Meter Type so the sensors have the right units in Homeassistant.
Please also make sure that the selected Meter Type matches the dimension of the value provided by the meter!
Eg. if your meter provides m³, you need to also set it to m³.
Alternatively you can set the parameter DecimalShift to 3 so the value is converted to liters!
List of supported options:
otherwater_m3(usesm^3/has rate)water_l(usesl/has rate, not officially supported by Homeassistant!)water_gal(usesgal/has rate, not officially supported by Homeassistant!)water_ft3(usesft^3/minas rate)gas_m3(usesm^3/has rate)gas_ft3(usesft^3/minas rate)energy_wh(usesWas rate)energy_kwh(usesKWas rate)energy_mwh(usesMWas rate)energy_gj(usesGJ/has rate, not officially supported by Homeassistant!)temperature_c(uses+C/minas rate)temperature_f(uses°F/minas rate)temperature_k(usesK/minas rate)
Note
Not all options are supported by Homeassistant, see SensorDeviceClass.VOLUME_FLOW_RATE in https://developers.home-assistant.io/docs/core/entity/sensor/#available-device-classes!
1.6.9 Parameter DomoticzIDX
Section: 1.6 MQTT
Default Value: 0
The Idx number for the counter device. Can be obtained from the devices setup page on the Domoticz system.
Note
If you edit the config file manually, you must prefix this parameter with <NUMBER> followed by a dot (eg. main.DomoticzIDX). The reason is that this parameter is specific for each <NUMBER> (<NUMBER> is the name of the number sequence defined in the ROI's).
1.6.10 Parameter RetainMessages
Section: 1.6 MQTT
Default Value: true
Enable or disable the Retain Flag for all MQTT entries.
Warning
Disabling (set to false) this does not clear the last retained value on the MQTT broker! This must be done manually, see How to Delete Retained Messages in MQTT? and this discussion!
1.6.11 Parameter Uri
Section: 1.6 MQTT
Default Value: mqtt://example.com:1883
URI to the MQTT broker including the port. E.g. mqtt://192.168.1.1:1883.
1.6.12 Parameter ValidateServerCert
Section: 1.6 MQTT
Default Value: true
Warning
This is an Expert Parameter! Only change it if you understand what it does!
Enable or disable the validation of the server certificate CN field.
If enabled (true), the certificate sent by the server is validated using the configured Root CA Certificate file.
The server name in uri is compared with the CN field of the server certificate.
A connection is only established if they agree. It ensures the origin of the server.
If disabled (false), the ESP32 skipped any validation of server certificate CN field.
This reduces the security of TLS and makes the MQTT client susceptible to MITM attacks.
Note
This also means that you might have to change the protocol and port in to mqtts://example.com:8883!
If you use public brokers, is recommended to set this parameter to "enabled (true)".
1.6.13 Parameter password
Section: 1.6 MQTT
Default Value: PASSWORD
Password for MQTT authentication.
1.6.14 Parameter user
Section: 1.6 MQTT
Default Value: USERNAME
Username for MQTT authentication.
1.7 Section InfluxDB
1.7.1 Parameter Database
Section: 1.7 InfluxDB
Default Value: ''
Name of the InfluxDB v1 Database into which to publish the values.
Note
See section InfluxDBv2 for InfluxDB v2 support!
1.7.2 Parameter Field
Section: 1.7 InfluxDB
Default Value: undefined
Dedicated definition of the field for InfluxDB use for saving in the Influx database (e.g.: "watermeter/value").
Note
If you edit the config file manually, you must prefix this parameter with <NUMBER> followed by a dot (eg. main.Field). The reason is that this parameter is specific for each <NUMBER> (<NUMBER> is the name of the number sequence defined in the ROI's).
1.7.3 Parameter Measurement
Section: 1.7 InfluxDB
Default Value: undefined
Name of the InfluxDB v1 Measurement to use to publish the value.
Note
See section InfluxDBv2 for InfluxDB v2 support!
1.7.4 Parameter Uri
Section: 1.7 InfluxDB
Default Value: undefined
URI of the HTTP interface to InfluxDB v1, without trailing slash, e.g. http://192.168.1.1:8086.
Note
See section InfluxDBv2 for InfluxDB v2 support!
1.7.5 Parameter password
Section: 1.7 InfluxDB
Default Value: undefined
Password for the InfluxDB v1 authentication.
Note
See section InfluxDBv2 for InfluxDB v2 support!
1.7.6 Parameter user
Section: 1.7 InfluxDB
Default Value: undefined
Username for the InfluxDB v1 authentication.
Note
See section InfluxDBv2 for InfluxDB v2 support!
1.8 Section InfluxDBv2
1.8.1 Parameter Bucket
Section: 1.8 InfluxDBv2
Default Value: ''
Name of the InfluxDB v2 Bucket into which to publish the values.
1.8.2 Parameter Database
Warning
This parameter is unused!
Use Basket instead!
1.8.3 Parameter Field
Section: 1.8 InfluxDBv2
Default Value: undefined
Field for InfluxDB v2 to use for saving.
Note
If you edit the config file manually, you must prefix this parameter with <NUMBER> followed by a dot (eg. main.Field). The reason is that this parameter is specific for each <NUMBER> (<NUMBER> is the name of the number sequence defined in the ROI's).
1.8.4 Parameter Measurement
Section: 1.8 InfluxDBv2
Default Value: undefined
Name of the InfluxDB v2 Measurement to use to publish the value.
1.8.5 Parameter Org
Section: 1.8 InfluxDBv2
Default Value: undefined
Organisation (Org) for InfluxDB v2 authentication
1.8.6 Parameter Token
Section: 1.8 InfluxDBv2
Default Value: undefined
Token for InfluxDB v2 authentication
1.8.7 Parameter Uri
Section: 1.8 InfluxDBv2
Default Value: undefined
URI of the HTTP interface to InfluxDB v2, without trailing slash, e.g. http://192.168.1.1:8086.
1.9 Section Webhook
1.9.1 Parameter ApiKey
Section: 1.9 Webhook
Default Value: undefined
ApiKey sent as Header
1.9.2 Parameter UploadImg
Section: 1.9 Webhook
Default Value: 0 (NEVER)
Available options:
0:NEVER1:ALWAYS2:ON_ERROR
1.9.3 Parameter Uri
Section: 1.9 Webhook
Default Value: undefined
URI of the HTTP Endpoint receiving requests, e.g. http://192.168.1.1/watermeter/webhook.
1.10 Section GPIO
1.10.1 Parameter IO0
Section: 1.10 GPIO
Default Value: input disabled 10 false false
Warning
This is an Expert Parameter! Only change it if you understand what it does!
This parameter can be used to configure the GPIO IO0 pin.
Warning
This pin is only usable with restrictions! It must be disabled when the camera is used. Additionally, it is used to activate Bootloader mode and must therefore be HIGH after a reset!
Parameters:
GPIO 0 state: One ofinput,input pullup,input pulldownoroutput.GPIO 0 use interrupt: Enable interrupt triggerGPIO 0 PWM duty resolution: LEDC PWM duty resolution in bitGPIO 0 enable MQTT: Enable MQTT publishing/subscribingGPIO 0 enable HTTP: Enable HTTP write/readGPIO 0 name: MQTT topic name (empty =GPIO0). Allowed characters:a-z, A-Z, 0-9, _, -.
1.10.2 Parameter IO1
Section: 1.10 GPIO
Default Value: input disabled 10 false false
Warning
This is an Expert Parameter! Only change it if you understand what it does!
This parameter can be used to configure the GPIO IO1 pin.
Warning
This pin is by default used for the serial communication as TX pin (USB logging)!
Parameters:
GPIO 1 state: One ofinput,input pullup,input pulldownoroutput.GPIO 1 use interrupt: Enable interrupt triggerGPIO 1 PWM duty resolution: LEDC PWM duty resolution in bitGPIO 1 enable MQTT: Enable MQTT publishing/subscribingGPIO 1 enable HTTP: Enable HTTP write/readGPIO 1 name: MQTT topic name (empty =GPIO1). Allowed characters:a-z, A-Z, 0-9, _, -.
1.10.3 Parameter IO12
Section: 1.10 GPIO
Default Value: input-pullup disabled 10 false false
Warning
This is an Expert Parameter! Only change it if you understand what it does!
This parameter can be used to configure the GPIO IO12 pin.
Note
This pin is usable without known restrictions!
Parameters:
GPIO 12 state: One ofexternal-flash-ws281x,input,input pullup,input pulldownoroutput.GPIO 12 use interrupt: Enable interrupt triggerGPIO 12 PWM duty resolution: LEDC PWM duty resolution in bitGPIO 12 enable MQTT: Enable MQTT publishing/subscribingGPIO 12 enable HTTP: Enable HTTP write/readGPIO 12 name: MQTT topic name (empty =GPIO12). Allowed characters:a-z, A-Z, 0-9, _, -.
1.10.4 Parameter IO13
Section: 1.10 GPIO
Default Value: input-pullup disabled 10 false false
Warning
This is an Expert Parameter! Only change it if you understand what it does!
This parameter can be used to configure the GPIO IO13 pin.
Note
This pin is usable without known restrictions!
Parameters:
GPIO 13 state: One ofinput,input pullup,input pulldownoroutput.GPIO 13 use interrupt: Enable interrupt triggerGPIO 13 PWM duty resolution: LEDC PWM duty resolution in bitGPIO 13 enable MQTT: Enable MQTT publishing/subscribingGPIO 13 enable HTTP: Enable HTTP write/readGPIO 13 name: MQTT topic name (empty =GPIO13). Allowed characters:a-z, A-Z, 0-9, _, -.
1.10.5 Parameter IO3
Section: 1.10 GPIO
Default Value: input disabled 10 false false
Warning
This is an Expert Parameter! Only change it if you understand what it does!
This parameter can be used to configure the GPIO IO3 pin.
Warning
This pin is by default used for the serial communication as RX pin (USB logging)!
Parameters:
GPIO 3 state: One ofinput,input pullup,input pulldownoroutput.GPIO 3 use interrupt: Enable interrupt triggerGPIO 3 PWM duty resolution: LEDC PWM duty resolution in bitGPIO 3 enable MQTT: Enable MQTT publishing/subscribingGPIO 3 enable HTTP: Enable HTTP write/readGPIO 3 name: MQTT topic name (empty =GPIO3). Allowed characters:a-z, A-Z, 0-9, _, -.
1.10.6 Parameter IO4
Section: 1.10 GPIO
Default Value: built-in-led disabled 10 false false
Warning
This is an Expert Parameter! Only change it if you understand what it does!
This parameter can be used to configure the GPIO IO4 pin.
Warning
This pin is only usable with restrictions! By default, it is used for build-in flash light (onboard LED).
Parameters:
GPIO 4 state: One ofbuilt-in-led,input,input pullup,input pulldownoroutput.GPIO 4 use interrupt: Enable interrupt triggerGPIO 4 PWM duty resolution: LEDC PWM duty resolution in bitGPIO 4 enable MQTT: Enable MQTT publishing/subscribingGPIO 4 enable HTTP: Enable HTTP write/readGPIO 4 name: MQTT topic name (empty =GPIO4). Allowed characters:a-z, A-Z, 0-9, _, -.
1.10.7 Parameter LEDColor
Section: 1.10 GPIO
Default Value: 150 150 150
Color of the attached LEDs to GPIO12 in Red, Green Blue from 0 (full off) .. 255 (full on)
(See IO12 parameter).
1.10.8 Parameter LEDNumbers
Section: 1.10 GPIO
Default Value: 2
Number of LEDs on the external LED-stripe attached to GPIO12 (See IO12 parameter).
1.10.9 Parameter LEDType
Section: 1.10 GPIO
Default Value: WS2812
Type of the WS2812x which is connected to GPIO12 (See IO12 parameter).
1.10.10 Parameter MainTopicMQTT
Section: 1.10 GPIO
Default Value: wasserzaehler/GPIO
Note
This parameter is not accessible through the Web Interface Configuration Page!
The GPIO Interface is prepared to report it's status and status changes as a MQTT topic. With this parameter you configure the MQTT main topic, under which the status is published.
As this parameter is still experimental it can only be set manually in the config.ini itself and has not been tested in detail so far.
1.11 Section AutoTimer
1.11.1 Parameter AutoStart
Section: 1.11 AutoTimer
Default Value: true
Warning
This parameter is no longer available. The flow is now always enabled. If you want it to be disabled, set an interval which is high enough (eg. 1440 = 24h).
1.11.2 Parameter Interval
Section: 1.11 AutoTimer
Default Value: 5
Unit: Minutes
Interval in which the Flow (Digitization Round) is run. It will run immediately on startup and then the next time after the given interval. If a round takes longer than this interval, the next round gets postponed until the current round completes.
If the flow gets started by a MQTT message or the REST API call, the interval automatically gets reset.
Note
If you want the flow to be disabled, set an interval which is high enough (eg. 1440 = 24h).
1.12 Section DataLogging
1.12.1 Parameter DataFilesRetention
Section: 1.12 DataLogging
Default Value: 3
Unit: Days
Number of days to keep the data files (0 = forever).
1.12.2 Parameter DataLogActive
Section: 1.12 DataLogging
Default Value: true
Activate data logging to the SD-Card.
The files will be stored in /log/data/data_YYYY-MM-DD.csv. See Data Logging for details.
Warning
A SD-Card has limited write cycles. Since the device does not do Wear Leveling, this can wear out your SD-Card!
1.13 Section Debug
1.13.1 Parameter LogLevel
Section: 1.13 Debug
Default Value: 1 (ERROR)
Define the log level for the logging to the SD-Card.
Available options:
1:ERROR2:WARNING3:INFO4:DEBUG
As higher the level, as more log messages get written to the SD-Card.
Warning
DEBUG or INFO might damage the SD-Card if enabled long term due to excessive writes to the SD-Card!
A SD-Card has limited write cycles. Since the device does not do Wear Leveling, this can wear out your SD-Card!
1.13.2 Parameter LogfilesRetention
Section: 1.13 Debug
Default Value: 3
Unit: Days
Number of days to keep the log files (0 = forever).
1.14 Section System
1.14.1 Parameter CPUFrequency
Section: 1.14 System
Default Value: 160
Set the CPU Frequency.
Warning
Setting it to 240 will lead to a faster device, but it will also require a stronger power supply! Additionally, depending on the quality of your ESP32-CAM, it might run unstable!
Possible values:
- 160
- 240
1.14.2 Parameter Hostname
Section: 1.14 System
Default Value: undefined
Warning
This is an Expert Parameter! Only change it if you understand what it does!
Hostname for the device.
It gets automatically transferred to /wlan.ini on the SD-Card at the next startup.
1.14.3 Parameter RSSIThreshold
Section: 1.14 System
Default Value: 0
Possible values: -100 .. 0 (0 = disabled).
Warning
This is an Expert Parameter! Only change it if you understand what it does!
This parameter activates a client triggered AP switching functionality (simplified roaming).
If actual RSSI value is lower (more negative) than RSSIThreshold, all WIFI channels will be scanned for configured access point SSID. If an access point is in range which has better RSSI value (less negative) than actual RSSI value + 5 dBm, the device is trying to connect to this access point with the better RSSI value.
Note
The RSSI check only gets initiated at the end of each round to avoid any disturbance of processing.
Note
It gets automatically transferred to /wlan.ini on the SD-Card at next startup.
1.14.4 Parameter SetupMode
Section: 1.14 System
Default Value: true
Note
This parameter is not accessible through the Web Interface Configuration Page!
Set this parameter to true to stay in the Setup Mode after the next start of the device.
1.14.5 Parameter TimeServer
Section: 1.14 System
Default Value: pool.ntp.org
Warning
This is an Expert Parameter! Only change it if you understand what it does!
Time server to synchronize system time. If it is disabled or undefined, pool.ntp.org will be used.
You can also set it to the IP of your router. Many routers like Fritzboxes can act as a local NTP server.
To disable NTP, you need to activate it but set the TimeServer config to be empty ("").
In such case the time always starts at 01.01.1970 after each power cycle!
1.14.6 Parameter TimeZone
Section: 1.14 System
Default Value: CET-1CEST,M3.5.0,M10.5.0/3
Time zone in POSIX syntax (Europe/Berlin = CET-1CEST,M3.5.0,M10.5.0/3 - incl. daylight saving)
Check the table on http://<DEVICE IP>/timezones.html to find the settings for your region.